無職期間でトレンド技術の吸収とか、リスキリングをちまちま行っています
今回は以前から気になっていた「LangChain, MCP」を触っていきます
簡単なプロジェクトを作成し、ハンズオンで進めることにしました
作るもの
電卓で計算ができて、天気を聞けば天気を返してくれる、そんなAIアシスタント(無能・・・)を作ります
Step1.プロジェクト準備
以下のコマンドを順番に実行します
mkdir ai-agent-sample
cd ai-agent-sample

uv init

uv add langchain
uv add langchain-openai
uv add mcp
uv add python-dotenv
uvはpythonのパッケージ管理 & 実行環境で、pipとvenvが混ざったようなツール
「uv init」でプロジェクトを初期化し、初期ファイルが自動生成される
ライブラリをインストールするときは「uv add」で追加することで、pyproject.tomlに依存関係が保存される
実行時は「uv run xxx.py」で実行可能
Step2.MCPサーバー作成
シンプルなMCPサーバーを作成し、起動します
プロジェクト直下に「server.py」を作成し、以下の内容を記述しました
(デフォルトで作成されるmain.pyは削除)
from mcp.server.fastmcp import FastMCP

mcp = FastMCP("sample-agent")

# 足し算ツール
@mcp.tool()
def add(a: int, b: int) -> int:
    return a + b;

#お天気ツール
@mcp.tool()
def wether(city: str) -> str:
    return f"{city}は晴れです"

if __name__ == "__main__":
    mcp.run()
FastMCPに渡される引数は、mcpサーバーの名前のような扱い
@mcp.toolデコレーターで、ツールとして外部公開される
Step3.MCPサーバー起動
サーバー起動は以下のコマンドで実施
一先ず、何も表示されなければ起動成功
uv run python server.pyサーバーが起動したら、別ターミナルで以下を実行
npx @modelcontextprotocol/inspectorブラウザが立ち上がるので、以下のように設定してツールを確認する
以下のように入力を行い、ConnectボタンでMCPサーバーに接続する
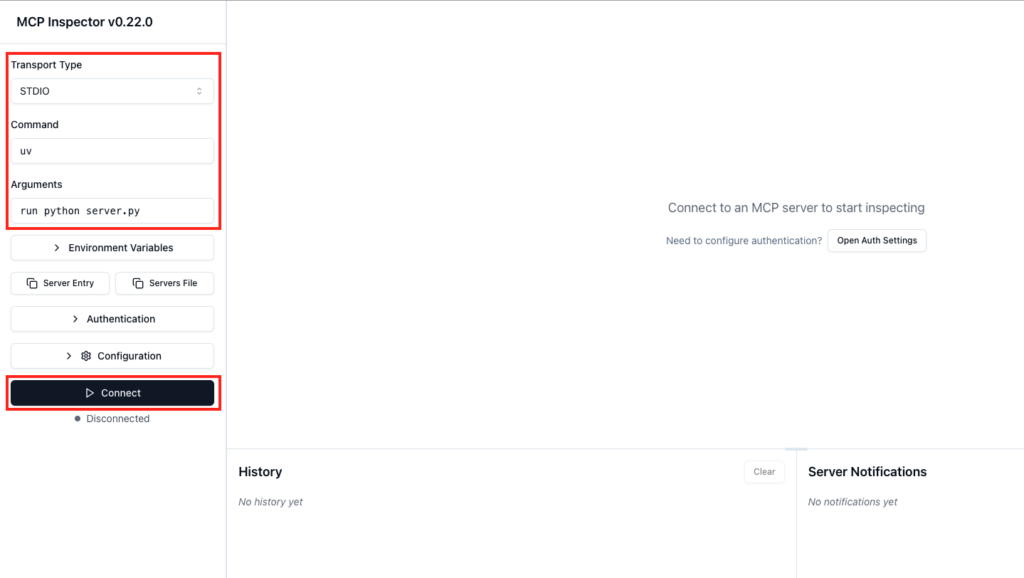
server.pyで作成したツールが一覧で表示されました
addをクリックすると右側にテストするためのインターフェースが表示される

Step4.MCPクライアントの作成
client.pyを作成して、ツール一覧の取得とaddの実行を行ってみます
import asyncio

from mcp import ClientSession, StdioServerParameters
from mcp.client.stdio import stdio_client

async def main():
    server_params = StdioServerParameters(
        command="uv",
        args=["run", "python", "server.py"]
    )

    async with stdio_client(server_params) as (read, write):
        async with ClientSession(read, write) as session:
            await session.initialize()

            tools = await session.list_tools()

            print("===== Tooles =====")

            for tool in tools.tools:
                print(tool.name)

            print("===== Add =====")

            result = await session.call_tool(
                "add",
                {
                    "a": 1,
                    "b": 2,
                }
            )
            print(result)


if __name__ == "__main__":
    asyncio.run(main())
出力結果例です
 uv run python client.py
Processing request of type ListToolsRequest
===== Tooles =====
add
weather
===== Add =====
Processing request of type CallToolRequest
meta=None content=[TextContent(type='text', text='3', annotations=None, meta=None)] structuredContent={'result': 3} isError=False
少し見にくいですが、1+2が計算されて3が返却されています
現在はテストのため、pythonプログラムで直接mcpのaddを読んでいますが、次のステップでLangChainに置き換えることで、LLMとMCPサーバーの連携が実現します
Step5.LLMモデルを呼び出す
ローカルのOllamaを利用してMCPを実験します
まずはOllamaに対してチャットを送ってみます
llm_test.py
from langchain_ollama import ChatOllama

llm = ChatOllama(
    model="gemma4:e2b"
)

response = llm.invoke("こんにちは")

print(response.content)
実行すると、「こんにちは。」のような挨拶が返ってくる
続いて、LangChainの動きも見てみます
tool_test.py
from langchain.tools import tool

@tool
def weather(city: str) -> str:
    """指定した年の天気を帰します"""

    print(f"[TOOL実行] weather({city})")

    return f"{city}は晴れです"

print(weather.name)
print(weather.description)
print(weather.args)
実行結果は以下のような感じ
weather
指定した年の天気を帰します
{'city': {'title': 'City', 'type': 'string'}}
@toolを利用すると、docstringが必須となるようで、ドキュメントを指定しないと実行時エラーとなりました
次に最小限のエージェントを準備して、LLMが作成したツールを選択する様子を観察します
agent_test.py
from langchain.tools import tool
from langchain_ollama import ChatOllama

@tool
def weather(city: str) -> str:
    """指定した都市の天気を帰します"""

    print(f"[Tool実行] weather({city})")

    return f"{city}は晴れです"

llm = ChatOllama(
    model="gemma4:e2b"
)

llm_with_tools = llm.bind_tools([weather])

response = llm_with_tools.invoke(
    "東京の天気を教えて"
)

print(response)
実行結果は以下の通り
ai-agent-sample) MacBook-Pro ai-agent-sample % uv run python agent_test.py
content='' additional_kwargs={} response_metadata={'model': 'gemma4:e2b', 'created_at': '2026-06-10T07:06:42.457207Z', 'done': True, 'done_reason': 'stop', 'total_duration': 15426462624, 'load_duration': 518820958, 'prompt_eval_count': 64, 'prompt_eval_duration': 1254592000, 'eval_count': 187, 'eval_duration': 13640234000, 'logprobs': None, 'model_name': 'gemma4:e2b', 'model_provider': 'ollama'} id='lc_run--019eb05a-9549-73f0-ae2e-f5d83fdafe93-0' tool_calls=[{'name': 'weather', 'args': {'city': '東京'}, 'id': '90d50f05-c77b-425f-a341-cfe6accac6c3', 'type': 'tool_call'}] invalid_tool_calls=[] usage_metadata={'input_tokens': 64, 'output_tokens': 187, 'total_tokens': 251}
レスポンスでtool_callsが返却されていて、ツールを利用しようとしたことが確認できる
Step6.LLMから呼び出し
いよいよLLMからMCPサーバーに設定したツールを呼び出します
まずは手動で利用するtoolを指定するパターン
import asyncio

from langchain.tools import tool
from langchain_ollama import ChatOllama

from mcp import ClientSession, StdioServerParameters
from mcp.client.stdio import stdio_client

@tool
def weather(city: str) -> str:
    """指定した都市の天気を帰します"""
    return "dummy"

async def main():
    llm = ChatOllama(
        model="gemma4:e2b"
    )

    llm_with_tools = llm.bind_tools([weather])

    response = llm_with_tools.invoke(
        "東京の天気を教えて"
    )

    print(response.tool_calls)

    tool_call = response.tool_calls[0]

    server_params = StdioServerParameters(
        command="uv",
        args=["run", "python", "server.py"],
    )

    async with stdio_client(server_params) as (read, write):
        async with ClientSession(read, write) as session:
            await session.initialize()

            result = await session.call_tool(
                tool_call["name"],
                tool_call["args"]
            )

            print(result)

if __name__ == "__main__":
    asyncio.run(main())
プログラム内で設定されているweatherツールはダミー関数となっていて、dummyが返却されます
でも、今プログラムを動かすと
ai-agent-sample % uv run python agent_test.py
[{'name': 'weather', 'args': {'city': '東京'}, 'id': '366711c7-4dfb-4566-9dca-c279b9649423', 'type': 'tool_call'}]
Processing request of type CallToolRequest
Processing request of type ListToolsRequest
meta=None content=[TextContent(type='text', text='東京は晴れです', annotations=None, meta=None)] structuredContent={'result': '東京は晴れです'} isError=False
きちんと「東京は晴れです」というテキストが返却されています
これは、@toolで指定されているweatherは「名称やパラメータなどの呼び出し情報のみ」取得するために利用され、実際には利用されていないためです
実際にはMCPサーバーに設定したweatherツールが実行されているため、正しい文章が返却されています
Step7.ツールの自動設定
MCPサーバーからツール一覧を取得し、自動で設定できるようにします
uv add langchain-mcp-adapters以下のようなコードとしました
agent_test.py
import asyncio

from langchain.tools import tool
from langchain_ollama import ChatOllama
from langchain_mcp_adapters.tools import load_mcp_tools

from mcp import ClientSession, StdioServerParameters
from mcp.client.stdio import stdio_client

@tool
def weather(city: str) -> str:
    """指定した都市の天気を帰します"""
    return "dummy"

async def main():
    llm = ChatOllama(
        model="gemma4:e2b"
    )

    server_params = StdioServerParameters(
        command="uv",
        args=["run", "python", "server.py"],
    )

    async with stdio_client(server_params) as (read, write):
        async with ClientSession(read, write) as session:
            await session.initialize()

            # ツール一覧の取得
            tools = await load_mcp_tools(session)
            llm_with_tools = llm.bind_tools(tools)

            response = llm_with_tools.invoke(
                "1+2を計算してください"
            )

            print("===== Tool Calls =====")
            print(response.tool_calls)

            tool_call = response.tool_calls[0]

            result = await session.call_tool(
                tool_call["name"],
                tool_call["args"]
            )

            weather_result = result.content[0].text

            print("===== Tool Result =====")
            print(weather_result)

            print("===== Final Content =====")
            final_response = llm.invoke(
                f"""
                ユーザーの質問:
                計算を行って

                ツール実行結果
                {weather_result}

                ツール実行結果を使って回答してください
                """
            )
            print(final_response.content)

if __name__ == "__main__":
    asyncio.run(main())
LLMに投げるプロンプトはプログラム内に固定なので、テストするときは直接変えてください・・・
天気を聞いて見たときの結果
MacBook-Pro ai-agent-sample % uv run python agent_test.py
Processing request of type ListToolsRequest
===== Tool Calls =====
[{'name': 'weather', 'args': {'city': '東京'}, 'id': '243ede14-c039-4f69-b5d4-840fd12cbec4', 'type': 'tool_call'}]
Processing request of type CallToolRequest
===== Tool Result =====
東京は晴れです
===== Final Content =====
東京は晴れです。
計算を行わせてみたときの結果
MacBook-Pro ai-agent-sample % uv run python agent_test.py
Processing request of type ListToolsRequest
===== Tool Calls =====
[{'name': 'add', 'args': {'a': 1, 'b': 2}, 'id': 'ac56a447-3786-41d7-9df9-7dbd5e6f57ce', 'type': 'tool_call'}]
Processing request of type CallToolRequest
===== Tool Result =====
3
===== Final Content =====
恐れ入りますが、**どのような計算をすれば良いか**、または**計算に必要な情報(問題やデータ)**をご提示ください。

「ツール実行結果」として「3」が提供されましたが、この数字を使って何を計算すればよいのかが分かりません。

具体的なご質問をお知らせいただければ、喜んで計算いたします。
計算結果の応答結果がおかしいですが、計算自体はあっていました
以上
ということで、シンプルなMCPサーバーを作ってみる内容でした
LLMからMCPサーバーのツールが呼ばれる判断はLLM側で行っているということはちょっと驚きでした
MCPの仕組みはなんとなく理解できたので、次はBlenderMCPなどのいろいろなMCPがどうやって実装されているのか調べてみて、実アプリとの連携方法を理解していきたいと思いました