リポジトリ
リポジトリはこちら
https://github.com/sheltie-fusafusa/SpringBootPractice
作ったアプリについて
「自分のバイクを登録できるだけ」のWebアプリです
バイクの(名前のみ)登録と、登録したバイクの一覧が表示されます
Thymeleafを利用したHTMLを返却するタイプと、REST APIでデータを返却するパターンを作成
Spring Initializr
今回はIntellij IDEAを利用します
Intellij IDEAにはSpring Initializrが付属しているので、この機能を利用してプロジェクトを作成しました
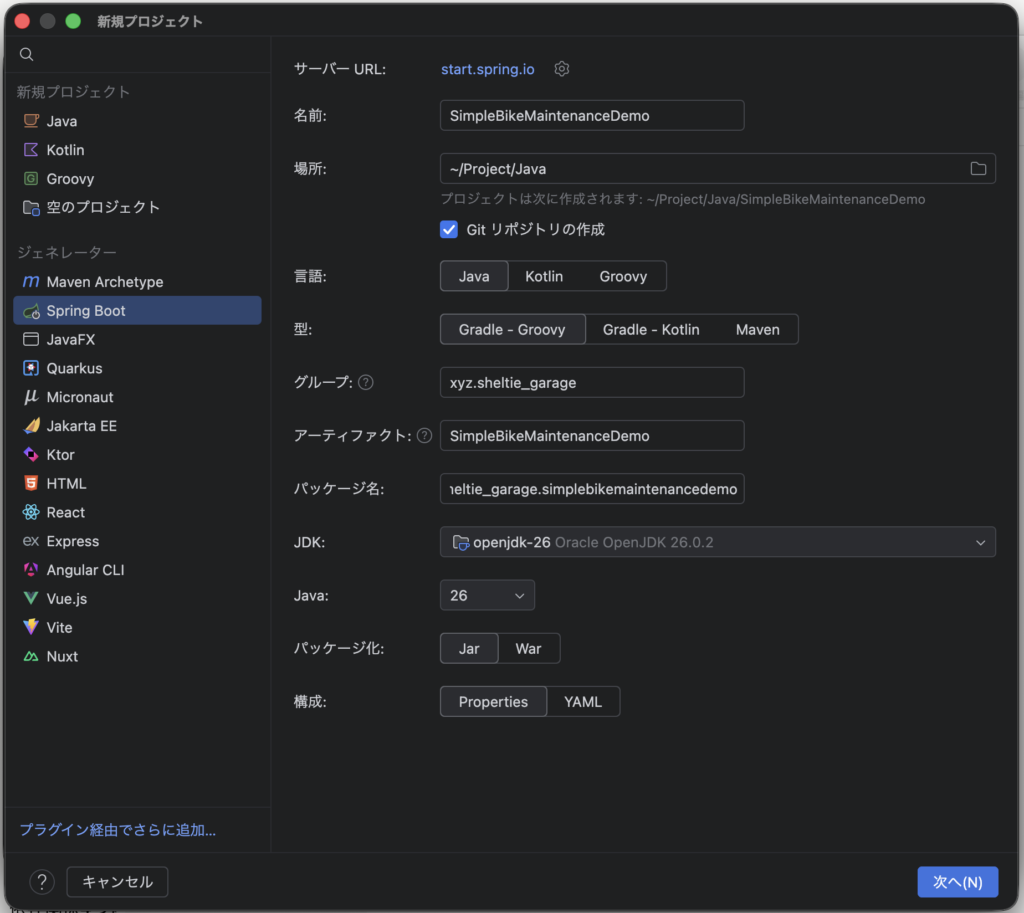
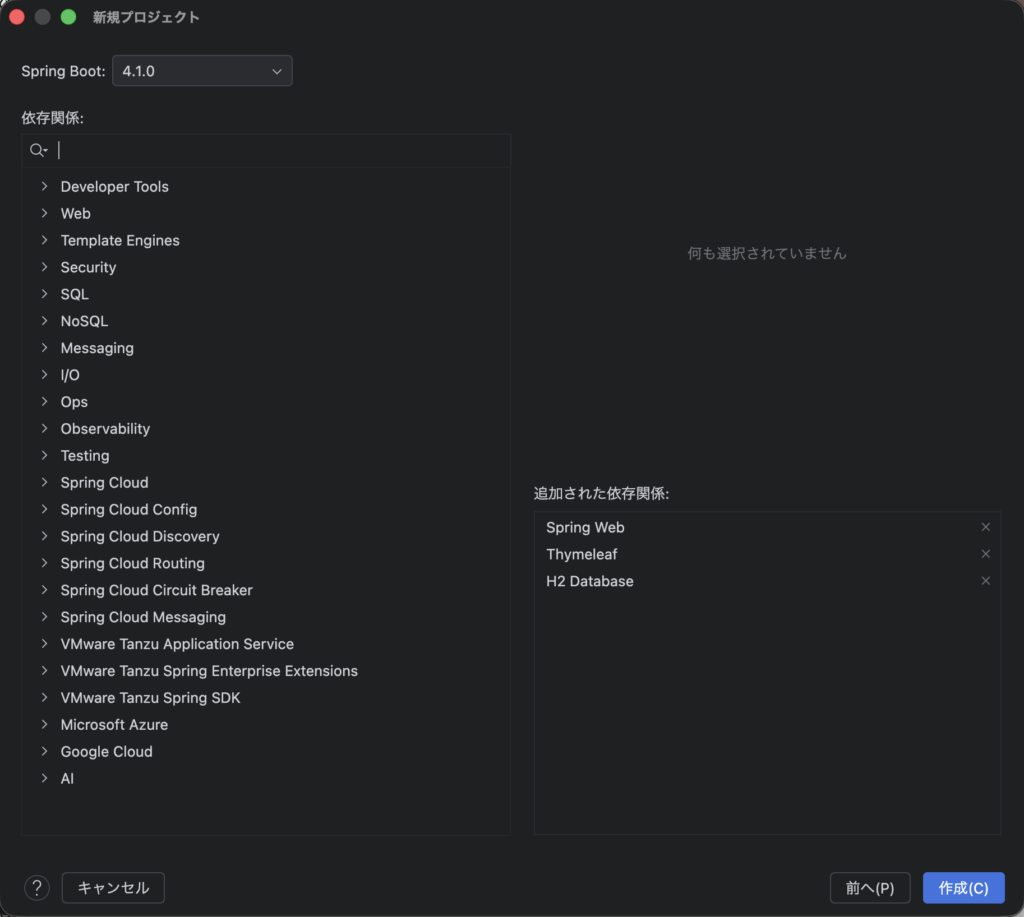
以上のような依存関係でプロジェクトを作成しました
今回は単純な思い出し会なので、DBは手軽に使えるH2(インメモリ)で使用しています
ORマッパーはMyBatisを利用しようと思ったのですが、Spring Initializrには適合するバージョンがありませんでした
ということで、MyBatisは `build.gradle`に直接手を加えて導入しています
dependencies {
    implementation 'org.mybatis.spring.boot:mybatis-spring-boot-starter:4.0.1' ←追加
   以降、自動生成から変更無し
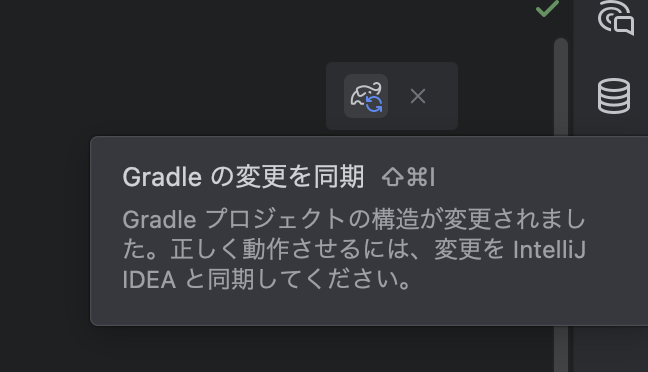
変更後は、以下のボタンからプロジェクトをリフレッシュできます
build.gradleを開いていれば右側にアイコンが表示されます
思い出しポイント1:MyBatisを利用したDB接続
データベースの接続は以下の方法で設定
resources/application.propertiesに設定しました
spring.application.name=SimpleBikeMaintenanceDemo

# H2データベースの設定
spring.datasource.url=jdbc:h2:mem:bikedb
spring.datasource.driver-class-name=org.h2.Driver
spring.datasource.username=sa
spring.datasource.password=


# H2コンソール
spring.h2.console.enabled=true
spring.h2.console.path=/h2-console

#MyBatis設定
mybatis.mapper-locations=classpath:mapper/*.xml
H2コンソールを指定しておけば、ブラウザから手軽にデータを確認することができます
次にschema.sqlと、初期データのdata.sqlを作ります
resources/schema.sql
CREATE TABLE IF NOT EXISTS bikes (
    id BIGINT AUTO_INCREMENT PRIMARY KEY,
    name VARCHAR(100) NOT NULL,
    created_at TIMESTAMP DEFAULT CURRENT_TIMESTAMP
);
resources/data.sql
INSERT INTO bikes (name) VALUES ('Bimota Tesi 3D');resource配下にschema.sqlとdata.sqlを作成しておけば、アプリ起動時に自動で実行してくれるとのこと!
ただ、「起動時に毎回実行される」ので注意!
今回はインメモリで利用しているため、アプリ終了→メモリ内のDBの消去 の流れなので毎回実行されても問題ないけど
将来的にMySQLなどの永続性のあるDBに変更した場合、毎回実行されるのでゴミデータができたり一意制約エラーになる可能性がある
resource配下にmapperを作成して、具体的なSQL情報を記述
resources/mapper/BikeMapper.xml
<?xml version="1.0" encoding="UTF-8" ?>
<!DOCTYPE mapper
        PUBLIC "-//mybatis.org//DTD Mapper 3.0//EN"
        "http://mybatis.org/dtd/mybatis-3-mapper.dtd">
<mapper namespace="xyz.sheltie_garage.simplebikemaintenancedemo.mapper.BikeMapper">

    <insert id="insert" parameterType="xyz.sheltie_garage.simplebikemaintenancedemo.entity.Bike">
        INSERT INTO bikes (name) VALUES (#{name})
    </insert>

    <select id="selectAll" resultType="xyz.sheltie_garage.simplebikemaintenancedemo.entity.Bike">
        SELECT id, name, created_at AS createdAt FROM bikes
    </select>

</mapper>
昔Javaで開発しているときにありがちだったのは、namespaceや〇〇Typeを指定するときのパスが間違えていて、うまくデータが取れなかったりということが多かった
この辺りは気を付けて指定したいところです
ということで、マッパーとエンティティは以下に作成しました
java/xyz/sheltie_garage/simplebikemaintenancedemo/mapper/BikeMapper.java
package xyz.sheltie_garage.simplebikemaintenancedemo.mapper;

import org.apache.ibatis.annotations.Mapper;
import xyz.sheltie_garage.simplebikemaintenancedemo.entity.Bike;

import java.util.List;

@Mapper
public interface BikeMapper {
    void insert(Bike bike);
    List<Bike> selectAll();
}
java/xyz/sheltie_garage/simplebikemaintenancedemo/entity/Bike.java
package xyz.sheltie_garage.simplebikemaintenancedemo.entity;

import java.time.LocalDateTime;

public class Bike {
    private Long id;
    private String name;
    private LocalDateTime createdAt;

    public Long getId() {
        return id;
    }

    public void setId(Long id) {
        this.id = id;
    }

    public String getName() {
        return name;
    }

    public void setName(String name) {
        this.name = name;
    }

    public LocalDateTime getCreatedAt() {
        return createdAt;
    }

    public void setCreatedAt(LocalDateTime createdAt) {
        this.createdAt = createdAt;
    }
}
エンティティはシンプルにメンバ変数とgetter / setterで構成されてます
Lambokを導入すれば、この辺りのボイラープレートコードを自動生成できますね
(Intellii IDEAではGetter / Setter生成機能があるので、Lambokが無くてもそこまで手間ではない)
ビジネスロジック(Serviceクラス)を作る
ビジネスロジックはServiceクラスに作成しました
今回はデータの登録、データ取得しかありません
java/xyz/sheltie_garage/simplebikemaintenancedemo/service/BikeService.java
package xyz.sheltie_garage.simplebikemaintenancedemo.service;

import org.springframework.beans.factory.annotation.Autowired;
import org.springframework.stereotype.Service;
import xyz.sheltie_garage.simplebikemaintenancedemo.entity.Bike;
import xyz.sheltie_garage.simplebikemaintenancedemo.mapper.BikeMapper;

import java.util.List;

@Service
public class BikeService {

    private final BikeMapper bikeMapper;

    @Autowired
    public BikeService(BikeMapper bikeMapper) {
        this.bikeMapper = bikeMapper;
    }

    public void registerBike(String name){
        Bike bike = new Bike();
        bike.setName(name);
        bikeMapper.insert(bike);
    }

    public List<Bike> getAllBikes(){
        return bikeMapper.selectAll();
    }
}
@Serviceや@Autowiredなどのアノテーションを指定しています(あったあった! 懐かしい・・・)
適切なアノテーションを付与することでコードの可読性が上がると同時に、Spring側で正しく情報が管理され、Autowired指定時に適切なクラスを自動設定することができます
なので、アノテーションの付与を忘れたりすると、@Autowiredで適切なクラスが設定されません
ちなみに、昔はおまじないだと思っていた@Autowiredアノテーションですが、役割としては「必要とされる部品を、適切にインスタンス化して設定してくれる」アノテーションです
コントローラー作成
ビジネスロジックをServiceクラスに記述したことで、
・レスポンスとしてHTML(Thymeleaf)を返却するコントローラ
・REST API(JSON)を返却するコントローラ
の両方の処理が1つのビジネスロジックで対応できます
まずはThymeleafを利用するコントローラ
java/xyz/sheltie_garage/simplebikemaintenancedemo/controller/BikeController.java
package xyz.sheltie_garage.simplebikemaintenancedemo.controller;

import org.springframework.ui.Model;
import org.springframework.beans.factory.annotation.Autowired;
import org.springframework.stereotype.Controller;
import org.springframework.web.bind.annotation.GetMapping;
import org.springframework.web.bind.annotation.PostMapping;
import org.springframework.web.bind.annotation.RequestParam;
import xyz.sheltie_garage.simplebikemaintenancedemo.service.BikeService;

@Controller
public class BikeViewController {

    private final BikeService bikeService;

    @Autowired
    public BikeViewController(BikeService bikeService) {
        this.bikeService = bikeService;
    }

    @GetMapping("/bikes")
    public String listBikes(Model model){
        model.addAttribute("bikes", bikeService.getAllBikes());
        return "bikes/list"; // templates/bikes/list.htmlを返却
    }

    @PostMapping("/bikes")
    public String registerBike(@RequestParam String name){
        bikeService.registerBike(name);
        return "redirect:/bikes";  // 登録後はリダイレクト処理
    }
}
@PostMapping, @GetMappingでそれぞれURLのパスを指定
returnで返却するのはThymeleafのパス(ファイル)で、templateディレクトリ配下に配置したテンプレートを指定します
テンプレートは以下になります
resources/templates/bikes/list.html
<!DOCTYPE html>
<html lang="ja" xmlns:th="http://www.thymeleaf.org">
<head>
    <meta charset="UTF-8">
    <title>バイク一覧</title>
</head>
<body>
<h1>バイク管理</h1>

<form method="post" th:action="@{/bikes}">
    <input type="text" name="name" placeholder="バイク名" required>
    <button type="submit">登録</button>
</form>

<table border="1">
    <thead>
    <tr>
        <th>ID</th>
        <th>名前</th>
        <th>登録日時</th>
    </tr>
    </thead>
    <tbody>
    <tr th:each="bike : ${bikes}">
        <td th:text="${bike.id}"></td>
        <td th:text="${bike.name}"></td>
        <td th:text="${bike.createdAt}"></td>
    </tr>
    </tbody>
</table>
</body>
</html>
th:から始まる部分がThymeleafのタグです
このタグを利用してBeanのデータを表示したり、actionのURLを設定したりしています
PostMappingではテンプレートを返却せず、「”redirect:/bikes”;」を指定することで一覧画面にリダイレクトし、二重登録を防ぎます
(PRGパターン(Post-Redirect-Get)という書き方)
REST Controller
次はREST APIでの使用を想定したコントローラになります
java/xyz/sheltie_garage/simplebikemaintenancedemo/controller/BikeRestController.java
package xyz.sheltie_garage.simplebikemaintenancedemo.controller;

import org.springframework.beans.factory.annotation.Autowired;
import org.springframework.web.bind.annotation.*;
import xyz.sheltie_garage.simplebikemaintenancedemo.entity.Bike;
import xyz.sheltie_garage.simplebikemaintenancedemo.service.BikeService;

import java.util.List;

@RestController
@RequestMapping("/api/bikes")
public class BikeRestController {
    private final BikeService bikeService;

    @Autowired
    public BikeRestController(BikeService bikeService){
        this.bikeService = bikeService;
    }

    // 一覧取得
    @GetMapping
    public List<Bike> getAllBikes(){
        return bikeService.getAllBikes();
    }

    @PostMapping
    public String registerBike(@RequestParam String name){
        bikeService.registerBike(name);
        return "登録しました:" + name;
    }
}
アノテーションは@RestControllerを利用
@RequestMapping(“/api/bikes”)を指定することで、GETメソッドでアクセスすればリスト取得が、POSTメソッドでアクセス(データを送信)すればデータ登録が行われます
POSTメソッドに送信するデータのサンプルは以下になります
curl -X POST "http://localhost:8080/api/bikes" -d "name=Kawasaki Ninja"以上で簡単なWebアプリ作成は完了です
プロジェクト全体はGitHubへアップしていますので、参考にしてください
おまけ
h2-consoleを利用したデータ作成方法をメモしてきます
まず、WebコンソールにアクセスするためのURLは以下の通り
http://localhost:8080/h2-console以下の設定で接続できます
項目	入力する値
Driver Class	org.h2.Driver
JDBC URL	jdbc:h2:mem:bikedb
User Name	sa
Password	(空欄のまま)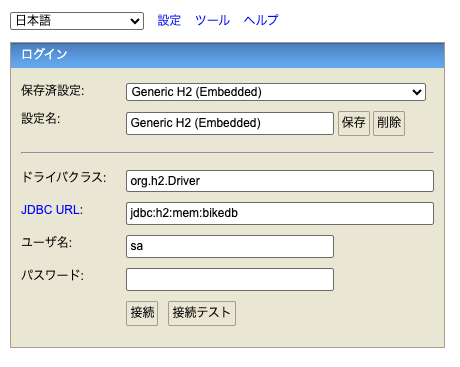
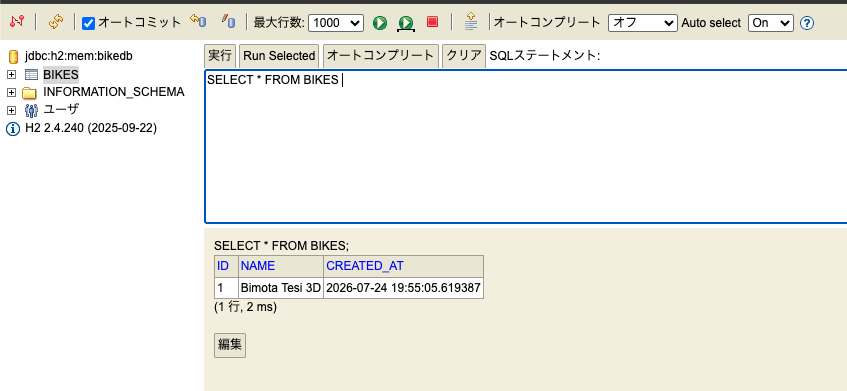
後はSQLを記述して実行すればデータが確認できます
以上
ということで、Java思い出し会でした
そろそろ就職先をと思って色々探し始めると、やっぱりJavaはまだまだ現役ということで思い出しておく必要があるなと痛感しました
Java自体、経験歴は長いのですが、同じシステムにずっと関わってた関係で知識が固定化してしまっています
無職という良い機会なので、Javaの知識も復習しておこうと思います